Thursday, March 1, 2012

Seed Time!

After a long hiatus during which I (finally) graduated with my master's, I'm back to normal and looking forward to our summer garden.  I started our seeds this past weekend and was happy to come home to this little cabbage sprout this afternoon!


I started 255 seeds total: the Jersey Wakefield cabbage above, a kaleidoscope pepper mix from Pinetree Garden Seeds, some saved jalapeno seeds, and several tomato varieties.  I started our usual Mortgage Lifter as well as some that are new to our garden including Sungold, Cherokee Purple, and Black Krim.  I also planted some saved seeds from one of my favorite varieties from last year, Paul Robeson.


All the little seeds are sitting, covered, on our kitchen windowsill to get sunlight and stay warm.  Now I'll just be waiting, excitedly checking their progress each day until they can join the other thirteen packets of vegetable and herb seeds I ordered in the garden in a few weeks.

For tips on starting seeds, see my post from last year.

Tuesday, September 6, 2011

Pizza!!

As the start of a new school year has whittled away at my free time (hence my lack of posts), I've been forced to face the fact that summer days spent in the garden and kitchen are gone. Instead, I've been trying to come up with some quick, healthy options for dinner. The garden is still providing us with more food than we can eat (see photos below) so I also want to make sure I'm putting our veggies to good use.


Since I still have lots of peppers, tomatoes, and basil growing, I've been making a lot of pizza. To save time, I just use a pre-made whole wheat crust and pile on the toppings.  I like the refrigerated dough in the bag from Trader Joe's, but there are tons of options available.  I don't like a lot of sauce, so I usually just brush the dough with olive oil.  Then I slather on a layer of ricotta with dried basil, oregano, garlic, and salt and pepper mixed in.


After this, the possibilities are pretty much endless.  Below are some of my favorite toppings: basil, bacon, tomatoes, fresh mozzarella, and roasted red peppers.  I usually cook and chop the bacon and roast and slice the peppers ahead of time to make things even faster after a long day of work and graduate school.


Once you get all the toppings on, it's just a matter of waiting until the cheese is bubbly and starting to brown.  Pictured below are a tomato, basil, mozzarella and bacon pizza (left) and a roasted red pepper and goat cheese pizza (right) I recently made during the week in less than 20 minutes.


Just slice, serve, and avoid those feelings of guilt that come with not using up your end of summer veggies!


Wednesday, August 10, 2011

Beets!

Recently I decided to harvest all of the beets growing in my garden.  I had been holding out because some of them still looked pretty small, but they hadn't really increased in size in about a month so I just pulled them all.


A lot of people don't like beets, but I grew up eating them with my grandmother and have always loved them.  They're also extremely good for you.

I had hoped to have enough to make a couple of jars of pickled beets but because it was a pretty small yield, I took another route and made a simple roasted beet salad instead.

Roasted Beet Salad with Balsamic and Goat Cheese
Any quantity of fresh beets
Goat Cheese
Balsamic Vinegar
Aluminum Foil
French Baguette 
Olive Oil


Heat the oven to 400 degrees.  Cut greens off the beets, leaving about 1/2 inch of the stems attached.  Greens can be lightly sauteed or used in a cold salad.  Wash the beets, but don't spend much time scrubbing as the skins will be removed after cooking.  Trim any stringy roots from the bottoms.


Once beets are washed and roots are removed, group them by size.  Using aluminum foil, create packets for each grouping by placing beets in the center of one piece of foil, topping with another, and folding up edges.


Place packets directly on the oven rack to roast.  Beets are ready when they can be pierced with a fork with no resistance.  This usually takes about an hour to an hour and fifteen minutes, depending on the sizes of the beets.  Obviously, smaller beets will cook faster, so check often.  While the beets are roasting, slice the baguette into 1/2 inch thick slices. 


When the beets are done, remove the packets from the oven.  Switch the oven to broil if you plan to use the it to toast the bread.  Be careful opening the packets as steam will escape. Allow beets to cool until they are tolerable to touch.  Gently slip the skins and stems off the beets by holding them in your palm and lightly rubbing them with a kitchen rag or paper towels.


Beets can be refrigerated whole to cool down or sliced immediately if you want to use them warm.  Place sliced beets in a bowl and toss with balsamic vinegar to taste. Crumble goat cheese using a fork in another small bowl.  The amount needed will depend on how many beets are being used. 


Lay beets on a plate and top with goat cheese crumbles.  Set aside.  Place baguette slices on a cookie sheet and lightly brush with olive oil.  Place under broiler, monitoring closely until bread is toasted.  Remove toasts from oven, place on a plate, and top with the beet salad.


Saturday, July 30, 2011

The Wrath of Nature: Aphids, Spots, Spores and Borers

Back in June I was talking with a fellow gardener and she kept reiterating how humbling gardening was and how it keeps her grounded.  I remember interpreting her meaning of 'humbling' as the feeling of amazement one gets when a plant they've started from seed bares fruit or the unbeatable freshness of just-picked produce on your plate.

Well, nature must have heard my thoughts and wanted to clear up what it really means for gardening to be a humbling experience because it seems to be using every trick in the book to make sure I understand this summer.

I wrote a few weeks ago about a rapidly progressing mildew problem I was having with my cucumber plants and how I'd cut them back to try and control it.  The spores had really gotten out of hand as can be seen in this black fuzz all over the cucumber vine below.


Here are photos of the cuts I made (left) and their current state (right).  


The leaves all grew back but the mildew continues to make them yellow.  They are actually doing better now and growing like crazy.  The organic fungicide I'd purchased proved useless, so I decided to go with an old home remedy: a weekly spray of 9 parts water to 1 part skim milk with a couple teaspoons of cooking oil thrown in for stickiness.  So far it seems to be keeping things under control.  Most importantly, the cucumber yield is back up. Below is what I was able to pick just yesterday.


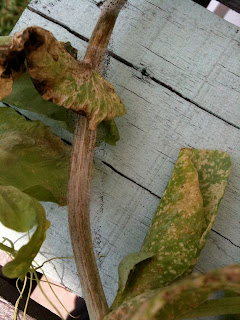
As this problem seemed to be reaching a more manageable state, the lovely squash borer came into my life.  These are fun little larvae that settle right in to the interior of squash plant vines and make this happen:


The first clue is a wilted plant (left) and, upon further inspection, one may find a rotten vine (right).  Cutting into your squash vine will likely reveal one of these little friends all tucked away nice and cozy and gorged on your delicious squash vine.


Additionally, you may find deserted brown casings from the pupal stage lurking around the base of your plants. Once the borers have moved in, you're kind of screwed.  The squash plants have likely already started dying and may have even stopped producing.  However, there were a few areas of new growth lurking on my plants so I cut the good parts off and stuck the ends of the vines back in the ground hoping they might take root for a few more rounds of squash.  It worked for a couple of the plants, but not all of them.


Another line of defense I am trying against the squash borers and other types of aphids which like to help themselves to delicious garden snacks is diatomaceous earth.  So far it seems to be helping.  I've sprinkled it everywhere once a week and more frequently if it rains.

This stuff is also great for controlling ants in compost, which is what I usually use it for.  It just comes in a huge bag, so I use an old coffee can with holes poked in the lid for dusting.


I haven't had any trouble with worms eating my tomatoes except for this one below which I quickly squashed.


I also found these weird eggs and little critters just starting to come to life on the underside of a tomato leaf one day, but they were promptly executed and I haven't seen any others since.


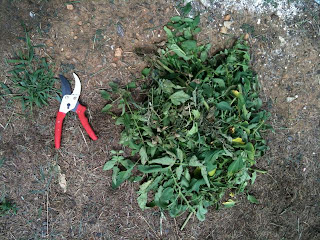
Coupled with my weekly milk spray and diatomaceous earth dusting is removal of infected leaves from tomato plants.  Most of my plants are still showing leaf spot on the bottom leaves, but I've been able to keep it in check by taking time every couple of days to cut off the infected areas so it doesn't spread.  


While nature is definitely showing me who is boss this year, I'm learning a lot and keeping copious notes in my garden journal for the future.  Despite everything that is testing me, I'm still having lots of success which I will share soon.