Monday, May 30, 2011

Controlling the Weeds

Taking care of what you're growing is the fun and rewarding part of having a garden, but unwelcome weeds can quickly become overwhelming and cut into the time you have to do the fun stuff.  Here are a couple of tips on how to keep weeds under control so you can focus on your veggies.

Grass clippings are great way to smother any weeds that may want to pop up in your garden.  The most important thing to consider is whether you have treated your lawn with any kind of chemicals or fertilizers.  If so, you'll unfortunately have to skip this idea.  Even if you're not trying to stay organic, the harsh chemicals many people use on their lawns will kill just about anything except grass and could potentially harm your vegetable plants. 


If your lawn is chemical free, putting grass clippings down between your rows can lock in heat and kill any weeds that may be trying to invade.  As veggie plants grow larger, you can also start to place clippings around the base of the plants to keep weeds down.  Continue to add clippings each time you mow until a nice cover forms over your garden's walkways and beneath your plants.


Spraying is another easy way to manage weeds.  There are a lot of nasty chemical weed killers on the market, but you can make your own non-toxic version with the household items and directions below.  


Vinegar Weed Killer:

1. Fill spray bottle almost to the top with distilled white vinegar.
2. Add three generous squirts (not drops) of dish soap.
3. Add two tablespoons of canola or other cooking oil.
4. Secure the lid and shake. 

Spray this directly onto weeds you want to kill on a hot sunny day.  This mixture won't work very well on overcast days.  The soap and oil help coat the weeds and the vinegar works with the sun to burn up the plant.  You can reapply as needed, just be sure to safeguard your vegetable plants from any of this spray as it will burn anything it comes in contact with. Spray again after any rainfall or after watering.   

Sunday, May 15, 2011

Prepping and Planting

Last weekend I finally made enough time to get my seeds in the ground.  Our garden had been tilled about a month prior, so my first step was to re-loosen the soil in the rows with a rake.


Next, I added some organic composted cow manure into the rows and mixed it with the native soil to increase the nutrients.


Then it was time to pull out the garden plan I'd made way back in February when my seeds had first arrived in the mail.  Planning is important to ensure you'll have a steady supply of vegetables and that everything will have enough space.  You can also plant certain things close together to fight off some pests.  I recently learned that placing dill between tomato plants can reduce the number of aphids on your tomatoes.  Sketching things out ahead of time can help you make the most of your space.


After a little fine tuning of my plan, I created labels for everything, stuck them in the dirt, and began digging holes and dropping in seeds.


Less than a week later, thanks to warm temperatures and plentiful rain in our area, everything has pushed up through the soil and started to grow.  

Early Wonder Beets

 Bright Lights Swiss Chard

 National Pickling Cucumbers and Homemade Pickle Cucumbers

 Speckled Calico Lima Beans

 Clemson Okra and Red Burgundy Okra

 Tall Telephone Peas

Lolita (Zucchini) Squash, Horn of Plenty (Yellow Crookneck) Squash, 
and Scallop Sunburst (Pattypan) Squash

In the next week or two, I will add our tomato plants and pepper plants to the garden and start thinning out some of the extra plants that have sprouted.  Until then, we'll be watching these continue to grow!

Saturday, April 30, 2011

Time to Transplant

My seedlings began falling over this week because they were long overdue for transplanting to larger containers.  Luckily, I had my last class of the semester for graduate school this past week, so I was homework free and able to tackle this beast of a project today.  In total I transplanted 60 seedlings and 12 bunches of basil.  Hopefully with increased exposure to the outdoors and more space to grow in their own containers, within 2-3 weeks they will get a little larger and hardier for an easy transition into the garden.


Here are some simple steps for successful transplanting:

1. Gather all your materials: potting/vegetable mix, seedlings, a plastic spoon, shovel, a bucket or large container, pots or repurposed containers, a sharpie, and a hammer and nail. You will need enough containers for each seedling to have its own.  This is also a great time time to utilize your compost if you have it.  Sadly ours is full of ants right now, so I skipped it for today.


2. Dump alternating cupfuls of potting mix and vegetable garden mix into your bucket.  Also add your compost if you have it.  Mix using your hands or a shovel.  You can use a single type of soil, but I like to mix mine so the plants get lots of different nutrients.  You will need to repeat this step throughout the transplanting process.


3. Count how many of each type of seedling you have and label containers for each one. You may think you'll remember what is in which containers later, but it is highly unlikely.  If you're using repurposed containers, poke 3-4 holes in the bottom of each one using your hammer and nail.

4. Fill your containers about 3/4 of the way with your soil mix.  Make a deep well in the soil using your finger or the end of your plastic spoon.  


5. Then, very carefully scoop up your first seedling using the plastic spoon.  Take a little of the dirt with you as this will help the seedling adjust to its new home.


6. Gently place the seedling's roots into the well you made in the soil.  Use your finger to lightly push it down if necessary.


7. Add more soil to the container using your spoon, covering all but about a quarter inch of the stem.  This will help the plant remain supported as it continues to grow. 

8. Gradually increase the amount of time your seedlings are spending outdoors.  Placing the containers in disposable aluminum pans or on trays makes it easy to move them back and forth.  They should ideally be outdoors all day and overnight for at least a week before moving to the garden. 

Look for more updates on how to get seedlings ready for going into the ground in the coming weeks!

Friday, April 22, 2011

New Beginnings

It was spring break for me this week so we took the opportunity to get our garden ready for planting.  With last year's garden being my first, I let my plants run their course to see how far into the tail end of summer I could continue to pick okra, tomatoes, and squash.  Then I got lazy and didn't pull out the plants when they died, so we had our work cut out for us this week.


Luckily my husband Jason likes to bring projects to fruition before even taking time to eat breakfast, so things went a lot faster than I thought they would.  Here he is tilling up our little plot after he'd pulled out the remaining dead plants and gargantuan weeds that had taken over.  My job was to bag it all up for our city's compost pick up.


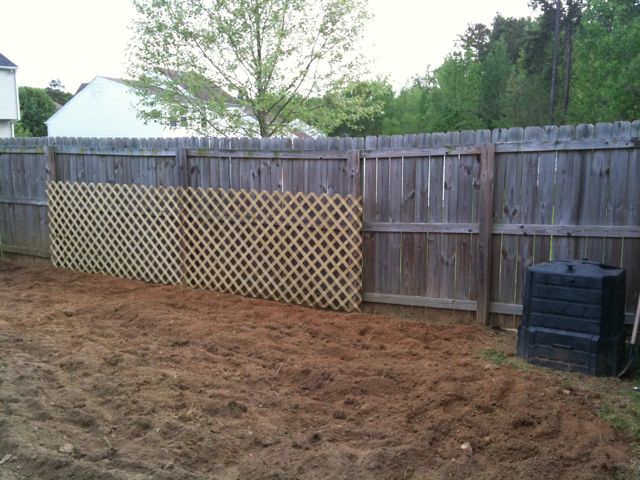
Once we finished we ventured out to purchase some lattice to attach to our back fence for our plants to climb.  Jason nailed it up and we were done for the day.


I hope to begin planting some seeds in the next couple of weeks with seedlings to follow shortly after.

Friday, April 8, 2011

Tofu How To

Every time I sit down at the lunch table in our lounge at work with some leftovers containing tofu, I get the same handful of responses: "Oh, I don't do tofu" or "I've never liked that stuff"or "It always tastes mushy."

I always feel the need to defend my beloved tofu, whose versatility, health benefits, and deliciousness are pretty amazing.  The truth is that many people with a negative view of tofu just don't know how to prepare it properly.

Instead of spending your time squeezing the moisture out of slices of tofu wedged under stacks of cookbooks on plates layered with ridiculous amounts of paper towels, try this easy method for firm tofu with a crispy, golden outer crust.

Heat about two tablespoons of cooking oil (I use canola) in a cast iron skillet over medium high heat.  While you're waiting on the oil to heat up, cut your tofu into cubes.


When the oil is heated, plop in your tofu cubes and spread them out into a single layer.

Monitor closely and check often until the bottom side is golden brown.  It usually takes about 5-8 minutes depending on your stove.

Once the underside is golden, flip the cubes over and repeat.  I use tongs to individually turn each piece, which seems laborious, but ensures even browning.


Once the tofu is browned on the top and bottom, you can kind of stir it around for a few minutes to crisp up the other sides.

Afterwards, toss into stir fry, with your favorite pasta and sauce, or into a wrap with seasoned veggies.

Thursday, March 24, 2011

A Little Sun


Once your seeds sprout and grow a bit, it is important to being slowly exposing them to the outdoors.  I've been setting mine outside in the sun for at least a couple hours each afternoon this week.  I only put them out if the weather is warm and luckily this week it's been nice and sunny.  I move them back into the house before the sun goes down.


Over the next couple weeks, I will gradually increase the amount of outdoor exposure time until they are outside all day.  This helps seedlings get ready for transplanting to the garden and increases the likelihood that they will survive once they're in the ground.    

Tuesday, March 15, 2011

A Delicious Experience

I wrote a guest post for Sarah Terry's Stitch Machine Blog about some important questions to ask yourself before you start a vegetable garden.  Check it out and while you're there, take a look at her Etsy shop and pick up some sweet accessories!